
Home > Archive > Developers/reference > Getting started
![]()
![]()
SpicyNodes provides you with a simple and intuitive web-based interface to create and display interactive information nodemaps and set its visualization parameters. The SpicyNodes interface is equipped with a rich development toolkit that enables you to customize the content and style of your nodemaps.
With this quick introduction, you can begin using SpicyNodes to develop highly customized nodemaps, and familiarize yourself with the features and facilities available to advanced developers.
![]()
If you’re a developer who intends to implement complex or large, organizational nodemaps, it is useful to understand the mechanisms driving the SpicyNodes engine so that you can optimize your own work using the flexibility of personal customization.
SpicyNodes operates by using a simple and open XML-based Application Programming Interface (API), based on two key configuration files in the XML format. The SpicyNodes web interface automates the creation process. After being created, both files stay on the SpicyNodes server; there, the SpicyNodes engine can directly access the files. In this simple scenario, no additional files need to be created and hosted on your server. More complex and flexible alternatives are reviewed and described in the “Overview of the API” section.
The two configuration files are nodemap.xml and settings.xml. The SpicyNodes web interface allows you to quickly and intuitively edit these files by setting values in a graphic environment. The nodemap XML file contains the hierarchy of nodes, including their names and descriptions, while the settings XML file allows you to adjust the visual and behavioral style of a SpicyNodes implementation. The “API Reference” section provides detailed descriptions of both.
![]()
The SpicyNodes Web interface consists of three units: 1) You configure the newly created nodemap with the “ Edit style” tool; 2) You create your nodes using the “Edit content” tool; and 3) You preview the nodes with the “Preview nodes” tool. In order to ensure a smooth workflow and best results, you may want to utilize these three units in a certain sequence, which you can learn about in more detail in our Author’s Guide or General Quickstart Guide.
For developers seeking more advanced methods of developing nodemaps with SpicyNodes, there are coding capabilities that offer alternatives or supplementation to the visual development tools in the interface. From development to implementation, you can combine the use of the visual tools and coding languages available to optimize your efficiency and development quality. In addition to developing using the visual SpicyNodes interface, you may wish to refer to the SpicyNodes Syntax page and SpicyNodes’ API Reference.
Develop a Nodemap - Visually, By SpicyNodes Code, By XML The “Define content” tool, as shown below, allows you to load an existing nodemap from the drop-down menu to continue developing, or to create a new nodemap from scratch.
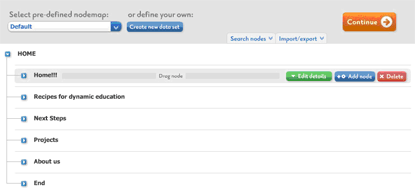
Visually, If you want to modify your loaded nodemap, simply roll your mouse cursor over any node to reveal its possible editing options: Edit details, Add node, Delete and Drag node.
By selecting Edit details, you can add or alter a node’s description or change a node’s color. Through the Add node option, you can attach a new node, which is by default added immediately below the current one. The nodes’ arrangement can be easily changed by choosing the Drag node option and dragging the node across the hierarchy to its new location. The Delete action does just that – delete the node. You can find more details on editing using the visual form of the SpicyNodes development interface.
In the Code view, the default textual representation is in SpicyNodes code, as per the radio button selected on the panel, instead of XML. Whether you look at this default code or see the XML equivalent, they are both automatically generated by the SpicyNodes engine. Therefore, you can develop the basic skeleton structure and content of your nodemap using the visual representation, then move to the code view to modify using SpicyNode syntax or in XML.
The nodemap XML API reference provides you with the library of XML functions available for you to develop your nodemap in XML; you can build nodemap content using its own specific set of XML functions. You can apply the XML code either by building your nodemap structure and content in a separate XML file or by modifying the generated code in the ‘Code view’ panel.
Whichever coding language you choose, the Import/export tool enables you to develop your nodemap in a separate text file, either before creating a visual nodemap on the interface and importing it once it’s ready, or by exporting a preliminary nodemap code-set generated. Either way, there is flexibility to import and export as text files at any time during the development process.
The SpicyNodes API Reference - XML, JavaScript & Extras While we have already touched upon SpicyNodes’ XML coding capabilities, it forms just part of a larger comprehensive (and continuously developing) SpicyNodes API, using the SpicyNodes API to work with JavaScript in the browser. The Javascript API reference provides an equivalent to the XML functions, as SpicyNodes enables XML trees to be transformed into JSON and back. With this extension to Javascript, you have more flexibility to work with flash and server-based content, among others.
As the SpicyNodes API continues to be developed, expanded, and revised, additional features will be implemented as part of the API, such as how to incorporate audio and video as part of your nodemap implementation. You may want to check the API reference section regularly for updates.
Customize Your Nodemap Settings - Visually, Textually
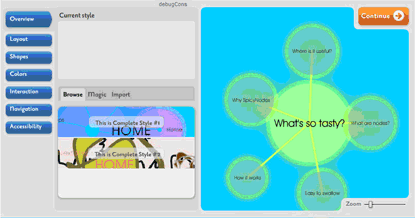
The “Edit style” tool on the SpicyNodes development interface, depicted in the above screenshot, allows you to fine-tune the presentation, format and interactivity options of the nodemap created. The buttons down the left-hand side represent which aspect of SpicyNodes’ visual and behavioral style they respectively manipulate. Each of the buttons, when clicked, opens a screen that lists its adjustable attributes. The styling tool typically comprises of three sections for each style feature: a Current area, a Configuration area and a Quick Preview area.
The Current area shows the attribute that is currently in use, while you can specify a new style by selecting an item from the Configuration area; further simultaneously seeing the effects in the Quick Preview area on the right side, which will display how the nodemap will look and behave. These panels enable you to alter the overall appearance of an entire nodemap.
Customization can as easily be applied through SpicyNodes syntax as well as in XML. Again, you can find a library of XML functions as part of the SpicyNodes API for XML-coded Custom Settings; and similarly, you can develop these independently of the SpicyNodes online interface, but you may have to import your offline text/XML file into the interface intermittently to view how your settings are materializing in practice in its visual form.
![]()
The “Edit style” tool in the SpicyNodes development interface, depicted in the screenshot above, allows you to fine-tune the presentation, format, and interactivity options of your nodemap. The buttons down the left side align with various aspects of SpicyNodes’ visual and behavioral styles. Each of the buttons, when clicked, opens a screen that lists its adjustable attributes. The styling tool typically consists of three sections for each style feature: a Current area, a Configuration area and a Quick Preview area.
The Current area shows the attribute that is currently in use. You can specify a new style by selecting an item from the Configuration area and simultaneously see the effect in the Quick Preview area on the right side, which displays how the nodemap will look and behave. These panels enable you to alter the overall appearance of an entire nodemap.
Customization can be applied through SpicyNodes syntax, as well as in XML. Again, you can find a library of XML functions as part of the SpicyNodes API for XML-coded Custom Settings. Similarly, you can develop these independently of the SpicyNodes online interface, but you may have to import your offline text/XML file into the interface intermittently to view how your settings are materializing visually.
![]()
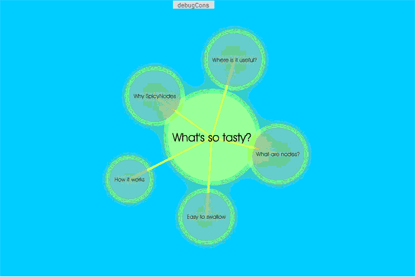
The "Preview nodes" tool allows you to preview your configuration in complete detail. It is meant to serve as the ultimate test bed before the nodemap is launched. You can experiment with the compiled configuration as if it were fully operational. You can, for example, test how the interactivity features work by pointing to a node with the mouse, seeing how the nodes respond when dragged (panned) or rotated, and noting how the node branches are formed based on the underlying layout algorithms.
You can choose to preview your nodemap in full screen, which will reflect how it will appear when the nodemap is delivered by URL (on the SpicyNodes server, or on your own server if you have a corporate SpicyNodes account), or even if the user decides to view the nodemap in full screen from the website the nodemap will be embedded in.
If you’re not satisfied with certain aspects of the configuration, you can go back to either the Nodemap Maker or the Node Configurator to make the needed revisions. Through the Simple Viewer, you can confirm the resulting changes.
The nodes can then be published by adding simple HTML code to you web site. (Click “Get HTML” from the Edit details tab for the nodemap, or under the Preview nodes tab page for the automatically-generated code) This procedure is a standard Flash object integration code, like the following, where the "id’" parameter indentifies your custom XML files, which can be generated by the web interface wizards discussed earlier. A sample of the generated HTML code follows:
<object classid="clsid:D27CDB6E-AE6D-11cf-96B8-444553540000" " height="480" width="720" codebase="http://download.macromedia.com/pub/shockwave/cabs/flash/swflash.cab>
<param name="movie"
value="http://media.spicynodes.org/display.swf?id=0123456789abcdef0123456789abcdef">
<param name="quality" value="high">
<param name="allowFullScreen" value="true">
<embed height="480" width="720" pluginspage="http://www.macromedia.com/go/getflashplayer" src="media.spicynodes.org/display.swf?id=0123456789abcdef0123456789abcdef" type="application/x-shockwave-flash" quality="high" allowFullScreen="true">
</object>
You can find out more about implementing your SpicyNodes nodemap into another site by visiting the embedding tutorial guide.
Note: Go to API Reference for a more detailed description of all programming parameters and their usage.

