


Mashup with Google Maps
Using Custom Graphics for Nodes
Personalize Nodes
JavaScript manipulation
Custom Sounds
Custom Fonts
Integrating


Home > Archive > Developers/reference > Recipes & mashups > Using Custom Graphics for Nodes
![]()
The API is still being finalized. This is a preview...
SpicyNodes has a highly customizable appearance that can be easily changed, as described in the Simple Customization section.
Once a style is set, it can still be replaced with a completely different style. This is analogous to painting, where you use a particular technique and work in a specific color range, and then alter only these attributes. All of a sudden, you have a Van Gogh transformed into a Matisse.
![]()
At times, though, you may wish to change only certain aspects of a style set, such as the graphic representation of a given node, for example, while keeping the other style attributes. You can accomplish this by first turning to the online node editor and launch its “Define nodes” mode. This will enable you to make simple adjustments quickly and easily. Alternatively, you will have more control over custom graphics for a given node by directly working with the nodemap XML configuration file.
![]()
In order to override the SpicyNodes’ ready-made style collections and decorate or personalize a node with a custom graphic, you can do so as follows:
Prepare your images by making them the smallest possible file size without sacrificing image quality. You can create a pair of large and small graphics, the large is displayed when a node is the center focus, and the small is displayed at other times. Then, upload the images to a web server. The images do NOT need to be on the same server as your XML files.
Having decided which nodes to customize, edit the nodemap configuration file (if necessary, consult the Nodemap XML file section for the complete details), adding the “src” and “lowsrc” attributes with their respective values (image URL) to the tags standing for the chosen nodes.
The Flash Player will load the newly provided graphics right away, so they will be available for testing immediately. Check the results to ensure that the graphics display properly. Then take pleasure in watching the beauty of your creation.
![]()
In the nodemap configuration file, each node is defined by a separate node tag. The node tag can have various attributes; the one that you will need to use to decorate or personalize nodes with images is “src”.
The “src” attribute takes as its value the URL of an image that will override the default graphic token of a node. If stored on the client side, these images can save bandwidth.
The image loaded by this attribute will serve only the highest level of nodes, otherwise known as level0. If in need to employ the same technique for the nested nodes, use the “lowsrc” attribute, with the same syntax. It will allow custom graphics for the children elements. If only “src” is provided, then the source image will be scaled to fit in the level1 nodes.
Here is an illustration:
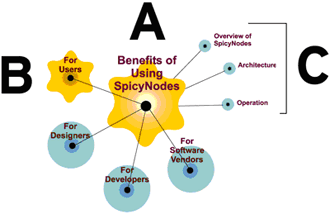
A = Custom “src”. This is the current focus node. The custom image is a gold star with a highlight.
B = Custom “lowsrc”. This is a non-focus node. The custom image is a simple gold star.
C = Custom “priority”. In some styles, the priority adjusts the node size. These nodes are smaller.
Although this process describes a single feature, you can refer to the complete set of customization options for the nodemap XML file in the Nodemap XML file section, which includes methods for substituting entire “brush sets” and “palettes” in order to create unique masterpieces.

