![]()
There are several ways to edit your node’s content. For relatively small nodemaps, an easy way to edit is to use the "Edit content" section of the SpicyNodes interface. Each of the various options and settings you can tweak is explained in this section.
![]()
The "Edit style" tab lets you modify the visual output or theme of your nodemap. These features are available to all members. Premium members have a few extra editing options.
This online editor lets you visually build out your nodemap and then modify each of the nodes to your heart’s content by adding descriptions to each node, changing its color, adding an image, linking it elsewhere, and so on.
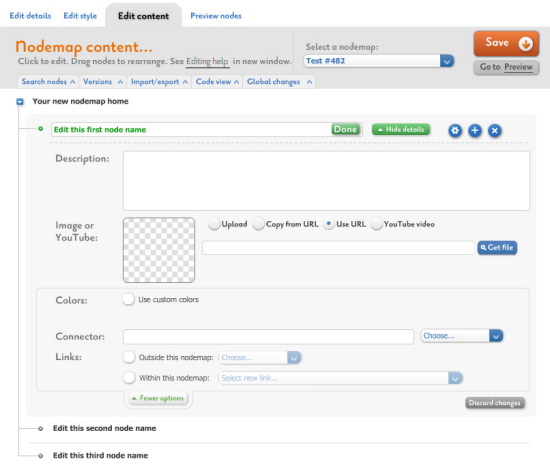
This is what the "Edit content" mode looks like:
![]()
Creating a node is deceptively simple. Just hover over the node under which you want to create the new node and a menu appears. Click on the blue + button and a node is automatically added as a new child of the node you click.

![]()
In most cases, you’ll create nodes non-sequentially and will then need to order them in a way that makes sense. SpicyNodes makes this particular action very easy. All you have to do is drag and drop each node to the position you’d like it to occupy.

Or, you can click the little grey buttons to change the location of a node in the overall hierarchy:

![]()
The SpicyNodes user interface let’s you specify the essential data of a node quickly and easily. Just click on the "Edit details" button to get started.
First, you can enter descriptive text for the currently selected node through the big text box. This text is displayed inside the node, below the title.
Next, you can specify a picture to be used inside the node. You can choose a picture on your hard drive or a picture from the Internet, use a URL to directly link to it or, for video, link a YouTube or Dailymotion video. When you click the "Get file" button, the image or video is acquired from the source you specify and a preview is displayed on the left so you can decide whether to keep it or replace it with another image.
![]()
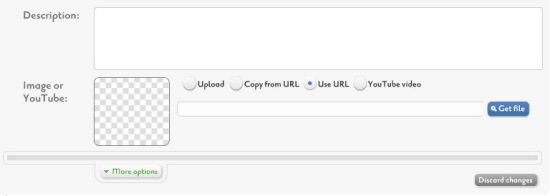
SpicyNodes also provides access to a few more advanced settings for you to leverage in your nodemaps. These options are displayed when the "More options" button is clicked.
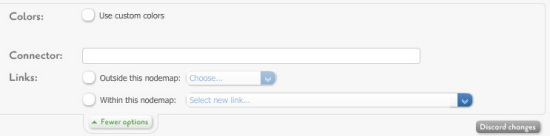
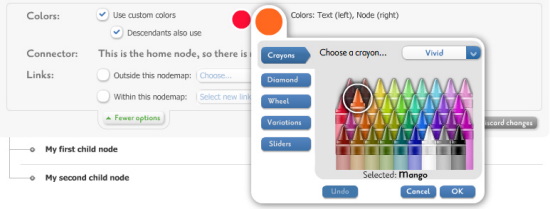
The first setting you can modify is the general color scheme of the nodemap. You can change the background color of the node and the color of the text that resides within it. Clicking on the color circles launches a pop-up through which you can pick the color you need. Do note that you’re not limited to the basic crayon model. You can use a color wheel, see variations, or just enter the hex code of the color you need from the "Sliders" mode.
Next up, you can specify the text of the connector that links to this node. This is primarily used to further strengthen the relationships between nodes. The connector text will appear between the node and its parent.
Finally, you can specify where this specific node links to. You can either choose to link to a web page outside of the nodemap or choose a node present within the current nodemap.
![]()
The premium version of SpicyNodes features many features not found in the community version. These include the ability to search each node’s content when editing, the option to keep multiple versions or revisions of a nodemap and to make global changes much more easily. Read more about premium features.

